Win Condition
30 to 0
Reduce the opposing hero’s health to zero before they do the same to you.
How To Play
Build a 50-card deck, gain mana each turn, and play creatures, spells, and monoliths. Reduce the opposing hero from 30 health to 0 to win.
Win Condition
30 to 0
Reduce the opposing hero’s health to zero before they do the same to you.
Deck Size
50 Cards
Choose one element and bring exactly 50 owned cards in any copy mix.
Turn Order
5 Steps
The rules order is always Draw, Mana, Play, Attack, End, even when solo auto-resolves the opening draw and mana before your first action.
Monolith Limit
2 In Play
Monoliths are powerful support structures, but each side may only keep two on the battlefield.
Interactive field lesson · 01
At the opening of your turn, draw the top card of your library. Your hand is private information.
Guided Missions
Each short mission fixes the matchup and gives you one concrete lesson to practise.
Mission 1 · The Brandmark
Damage and attack paths
Use direct damage to clear one defender, then attack the opposing hero.
Start missionMission 2 · The Canopy
Board growth and healing
Build three permanents and keep a damaged creature in play with healing.
Start missionMission 3 · The Fathom Courts
Control and card advantage
Delay an attacker, draw ahead, and take control before committing a finisher.
Start missionQuick Start
Start here for the win condition, deck rules, card types, and turn order.
Start Health
30
Both heroes begin at 30 health, so every early hit and drain effect matters.
Copies
Up to 3
Most cards can appear up to three times, which keeps decks focused without becoming single-card piles.
Fragmented
1 Turn
Fragmented creatures cannot attack on the turn they enter play. See the canonical glossary entry.
Table Read
Turn Flow
Turns always follow Draw, Mana, Play, Attack, and End. Solo play resolves Draw and Mana automatically before your first action.
01
Resolve any start-of-turn effects first, then draw 1 card. If your deck is empty, fatigue starts biting harder each time.
02
Increase your max mana by 1, refill to full, then resolve turn-based timers.
03
Spend mana to play any number of cards. You can keep up to 2 monoliths in play.
04
Only creatures that have been in play since your last turn may attack.
05
Finish the turn, resolve end-step effects, and pass play to your opponent.
Combat & Targeting
Combat is simple once you know the three cases. Hero attacks do not strike back. Creature fights do. Monoliths absorb damage but never hit back.
Creature vs Hero
The attacker deals its full attack to the opposing hero. The hero does not return damage in combat.
Creature vs Creature
Combat damage is simultaneous, so both creatures exchange damage unless one side was prevented or reduced.
Creature vs Monolith
The creature deals damage to the monolith, but the monolith never fights back. Damage stays on it until an effect restores health or boosts its health total.
Targeting Basics
Choose the right target
If a card says target player, you choose a hero. If it says target creature, you must pick a creature in play.
Read the timing words
On Play resolves immediately. On Hit needs combat to connect. Start of Turn waits for the next turn cycle.
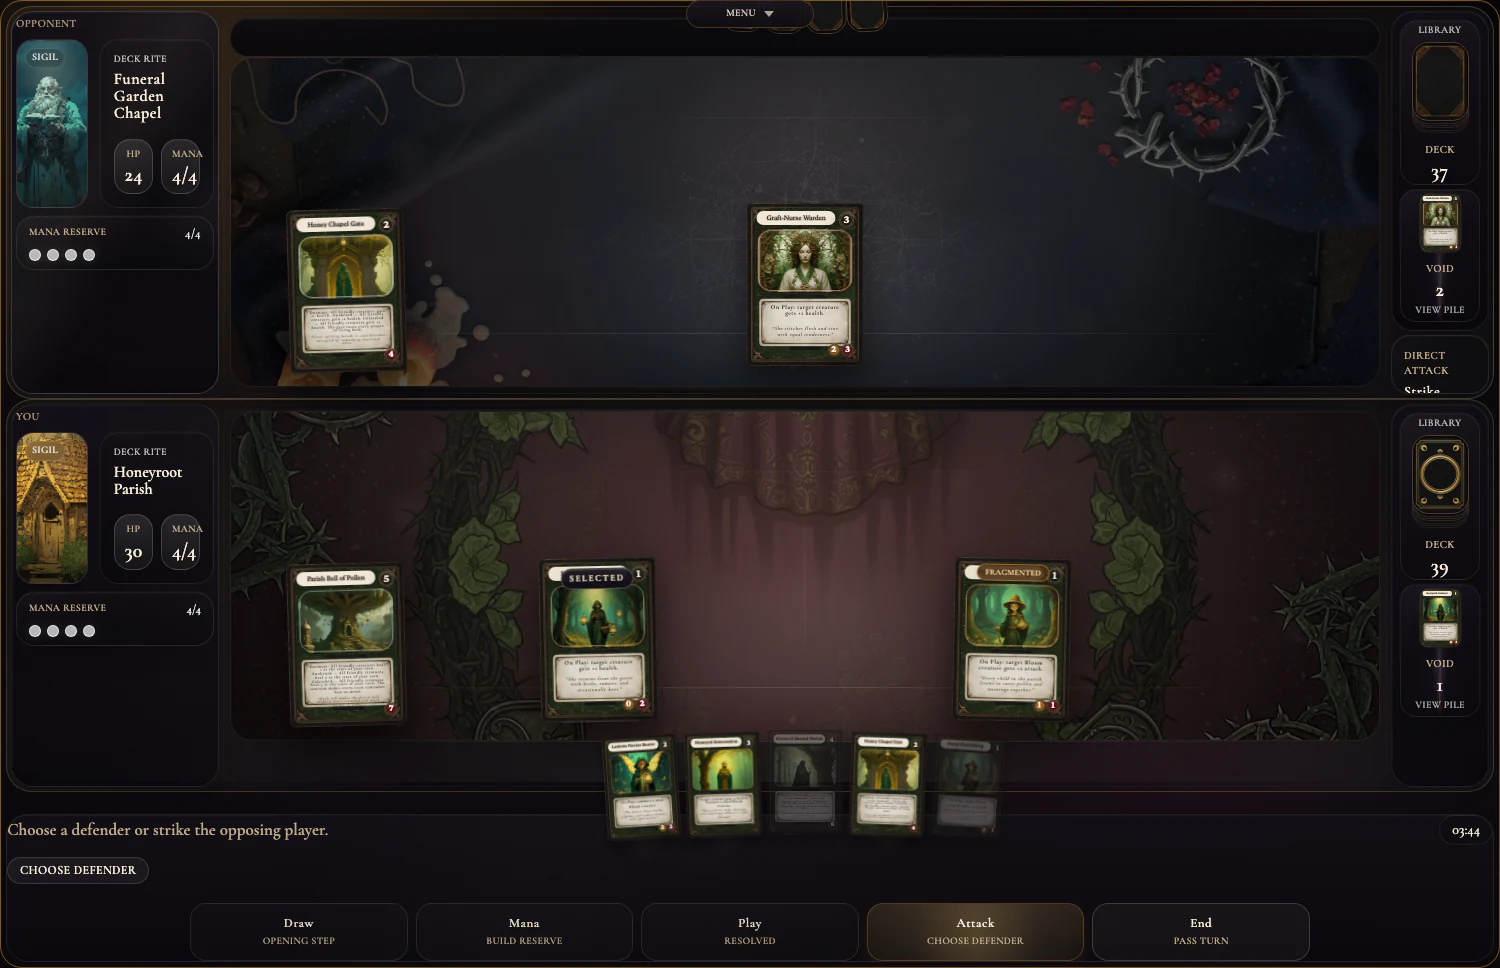
Battlefield Tour
Solo and online matches use the same lanes, targeting rules, deck rails, and action dock.
Shared board language
Upper lane means the opponent, lower lane means you. The left side is each hero's status hub, the right side is the Deck and Void / view pile rail, and the bottom dock is where phase prompts and live targeting instructions appear.
Battlefield tour
A clean board state with the main lanes, rails, and action surfaces visible.
The upper half is the opponent's battlefield. Their creatures hold the central slots while their monoliths anchor the side sockets.
The left panel tracks the hero, current health, mana, and reserve pips for that side of the duel.
The right rail holds the deck count above and the Void / view pile below, so spent and stolen cards stay readable at a glance.
The playmat is where permanents live. Creatures occupy the middle combat band, while monoliths sit in the recessed side sockets.
The lower half is your side of the board. Your ready creatures and monoliths stay here until they move into combat or get destroyed.
Your hand lives across the lower edge. Hover or right-click a card to preview it, then play it during the Play phase if it is legal.
The footer bar tells you the live phase. The banner on the left describes the current action window, and the phase steps track the turn flow.
The lower-right clock shows the active turn timer or match clock. It is your pacing reference when a live turn is underway.
Battlefield tour
This is what the table looks like when an attacker is committed and the battlefield is waiting for a legal defender.
If an attack or effect says target player, you are aiming at the opposing hero. Direct hero hits never take combat damage back.
Target creature means a creature permanent only. Creature fights return damage unless prevention or reduction changes the exchange.
Monoliths can be targeted separately from creatures. They absorb damage, never strike back, and can only occupy the side sockets.
The active attacker is the creature you have committed. Once selected, the battlefield waits for a legal defender or a direct hero strike.
When the footer says Choose defender, the game is in targeting mode. Use the visible target markers to pick a hero, creature, or monolith as allowed.
Targeting rules
Target player
Target player always means the hero, not a creature. If the strike goes through, the hero simply loses health.
Target creature
Target creature means a creature permanent only. In attacks, creature battles exchange damage both ways.
Target monolith
Target monolith means one of the side-socket structures. Monoliths take damage but never return combat damage.
Target marker
Whenever the dock says Choose target, Choose ability target, Choose start-of-turn target, or Choose defender, the visible battlefield target markers show what can legally be selected.
Preview and inspection
Card Anatomy
This is a real card from the archive. The printed face tells you its cost, role, text, and combat stats, while battlefield-only markers appear above it once the card is in play.
This is what you must spend during your play phase to cast the card.
Card names matter for recognition, deckbuilding, and effect references.
Pure presentation, but it makes faction and tone readable at a glance.
This is the game text that actually changes the table when the card resolves.
How much damage this creature deals when it strikes.
How much damage the creature can take before it dies.
Battlefield badges live above permanents. `Fragmented` means the creature cannot attack the turn it entered play.
Monoliths
Monoliths never attack and never strike back in combat. Their stage changes as their health drops, so a damaged monolith often becomes more threatening before it finally breaks unless another effect restores it first.
Example Monolith
This monolith heals all friendly creatures at the start of your turn, and that effect grows stronger as the monolith moves from Dormant to Awakened to Unleashed.
Dormant
The monolith is still steady and operating at its first stage of power.
Awakened
Once it has taken meaningful damage, the monolith shifts into its second, stronger stage.
Unleashed
This is the final stage. The monolith is close to destruction, but its effect is at maximum strength.
Reference
This glossary now tracks the actual effect language used by Freyed’s live cards and battlefield statuses, not just the beginner basics. If a card mentions an effect family below, this is the place to decode it.
Fragmented
Fragmented creatures cannot attack on the turn they enter play.
Example: If you summon a fresh attacker this turn, it stays Fragmented until your next turn begins.
Sealed
Sealed permanents cannot act or ready normally while the seal remains.
Example: A sealed creature cannot attack until the seal is removed.
Suspended
Suspended permanents cannot attack or use their normal actions while the delay lasts.
Example: A suspended blocker stays out of combat until the suspension ends.
Overloaded
Overloaded permanents stay unready and skip their future ready steps until the overload wears off.
Example: A creature with Overloaded 2 stays unable to act through the next two ready steps.
Spent
Spent permanents have already used their action for this turn and must wait to ready again.
Example: After a creature attacks, it is Spent until a later ready step refreshes it.
On Play
The effect happens immediately as the card resolves from your hand.
On Hit
The effect happens after the creature successfully connects in combat.
Start of Turn
The effect resolves as that player’s new turn begins, before later phases unfold.
Enemy Play
The effect triggers when an opposing permanent enters play.
Ally Spell Cast
The effect triggers when you cast a spell, often turning one card into a wider chain reaction.
While Alive
The effect remains active while that permanent stays on the battlefield.
Shield
Shield absorbs incoming damage before health is lost.
Example: A 2-Shield creature can take 2 damage with no health loss, then loses shield first.
Barrier
Barrier reduces incoming damage each time that creature is hit.
Example: A 2-Barrier creature shrugs off the first 2 damage from every hit it takes.
Fortify
Fortify raises a creature's maximum health.
Example: Fortify 1 lets a creature survive an extra point of damage in later trades.
Regen
Regen restores lost health without raising maximum health.
Example: A damaged creature with Regen 3 heals 3 damage but does not gain extra max health.
Empower
Empower raises a creature's attack.
Example: Empower 2 turns a 3-attack creature into a 5-attack threat.
Aura
Aura boosts a creature's attack and health together.
Example: A creature with +1 Aura hits harder and survives one more point of damage.
Weaken
Weaken lowers a creature's attack.
Example: Weaken 2 can turn a dangerous attacker into something your board can safely block.
Seal
Seal locks a permanent so it cannot act normally while sealed.
Example: A sealed creature cannot attack until the seal is gone.
Strike
Strike deals a clean burst of direct damage to a chosen target.
Burn
Burn is straightforward damage pressure, used to scorch a hero or permanent down by a fixed amount.
Blast
Blast spreads damage across the opposing board instead of focusing a single target.
Decay
Decay strips health away from creatures and can finish them without combat.
Drain
Drain damages the enemy while restoring health to you.
Example: Drain 2 can swing a race by dealing 2 and healing 2 at the same time.
Fray
Fray marks a target so the next hostile damage or decay against it hits harder before the mark is spent.
Suspend
Suspend delays a permanent, stopping it from acting while the effect holds.
Overload
Overload prevents a permanent from readying for future turns, buying tempo instead of immediate damage.
Banish
Banish removes a creature outright instead of merely damaging it.
Borrow
Deferred from V1Deferred for V1: borrow cards promise extra power now in exchange for a later debt payment, but Freyed V1 does not play or resolve borrow turns yet.
Example: If a card says Borrow 3, treat it as outside the live V1 rules set until borrow support ships.
Misdeal
Misdeal disrupts the normal card flow through an uneven or rigged exchange.
Example: Misdeal 1 can turn a clean draw or hand plan into an awkward, off-script resource trade.
Omen
Omen marks a delayed warning or forecast that creates future value after it is set.
Example: An omen card may ask you to accept a quiet turn now for a later payoff.
Draw
Draw moves fresh cards from the top of your deck into your hand.
Summon
Summon creates extra token bodies on your side of the battlefield.
Reclaim
Reclaim returns cards from your void or discard pile back into your hand.
Pilfer Hand
Pilfer Hand steals random cards directly from the opponent’s hand.
Pilfer Deck
Pilfer Deck steals cards from the top of the opponent’s deck before they can draw them.
Pilfer Grave
Pilfer Grave steals cards out of the opponent’s discard pile and converts their spent resources into yours.
Worked Examples
These examples show how card rules resolve during a match.
Play it
You spend 1 mana and put the creature into play.
Resolve the text
Its On Play effect deals 1 damage to the chosen opposing player immediately.
Wait a turn
The creature is Fragmented, so it cannot attack until your next attack phase.
Choose a target player
Because the text says target player, you point it at a hero, not a creature.
Resolve the spell
The target loses 2 health and you gain 2 health from the drain swing. If you want the exact keyword wording, jump to the Drain reference entry below.
Open the Drain glossary entry for the canonical rules text and example.
Discard it
Spells do their work right away, then leave the battlefield instead of staying in play.
Raise the monolith
It enters play and begins at its Dormant stage with the full health total intact.
Absorb pressure
Enemy creatures may attack it directly, but the monolith never deals return combat damage.
Grow more dangerous
As its health drops into later ranges, its healing aura becomes stronger before the monolith finally shatters.